How to Build a Floating Deck for Under $800 Without Permits
- dave6181
- Jul 20, 2025
- 5 min read
If you've been thinking about adding some outdoor living space but want to avoid the hassle of permits and complex construction, building a floating deck might be the perfect solution. In this guide, I’ll walk you through the entire process of how I built a roughly 10x10 floating deck coming off my porch with the help of my dad, who’s a carpenter. This project was affordable, practical, and designed to accommodate the unique challenges of a western climate.
Whether you’re a DIY enthusiast or just looking for a simple way to enhance your backyard, this step-by-step tutorial will show you how to build a floating deck that’s sturdy, level, and visually appealing — all without needing permits in many areas (but please check your local building codes first!).
Table of Contents
What is a Floating Deck and Why Choose It?
A floating deck is a deck that isn't permanently attached to your house or patio but is instead supported by concrete blocks or piers resting on the ground. I chose this design because it often allows you to bypass permit requirements, depending on your local regulations. Additionally, a floating deck can move vertically with seasonal ground shifts, which is especially useful in climates with freezing winters.
In my case, the deck is aligned with the existing concrete patio but not attached, allowing for natural expansion and contraction during winter months without damage to the structure.
Materials and Tools Needed
For this build, I used pressure-treated lumber, galvanized nails, joist hangers, concrete deck blocks, and a variety of screws. Here is a quick overview of the materials:
2 x 8 pressure treated lumber for rim joists and joists (x10)
4 x 4 x 8 Ground Contact Timber for load-bearing posts (1)
Concrete deck blocks (8)
Galvanized connector nails and structural wood screws
Joist hangers (strong tie brand)
Pressure-treated redwood-toned 5/4 x 6 x 10 deck boards (21)
Landscape fabric and spikes
Construction adhesive and waterproof stain
The full materials list I used is available through the Home Depot list I made specifically for this project. I recommend reviewing that list before starting your build.
Preparing the Site and Laying the Foundation
Before framing the deck, preparation was key. The area next to the patio had a lot of rocks and old weed barrier that needed to be excavated. I also began digging square holes for the concrete deck blocks, about a foot deep. Here’s the process I followed for each hole:

Remove rocks and cut away weed barrier, making a square twice the diameter of the deck block.
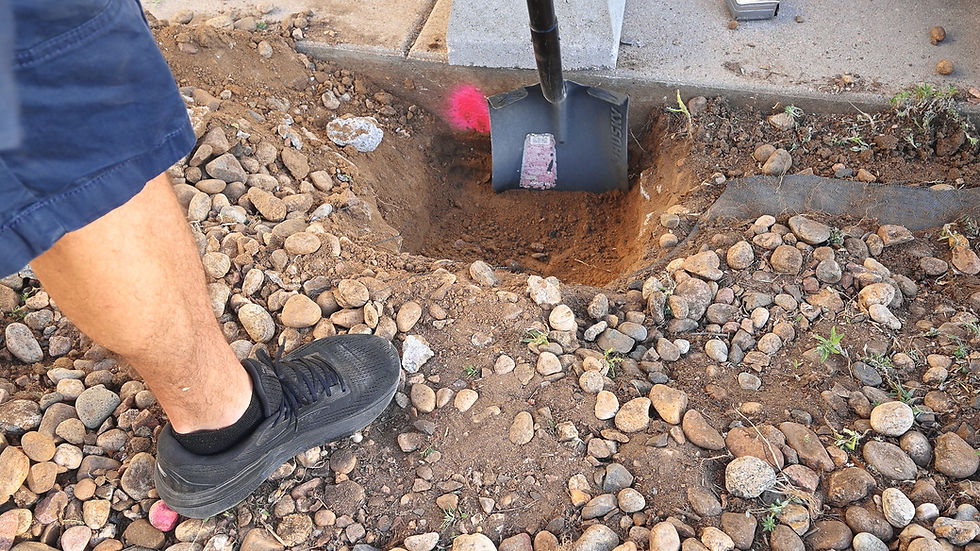
Dig about a foot down and tamp the ground level.
Fill the bottom with a few inches of gravel stone for drainage, tamping again until level.

Place the concrete deck block and double-check it is level.
Getting the blocks perfectly level was tedious but absolutely necessary for a stable deck.
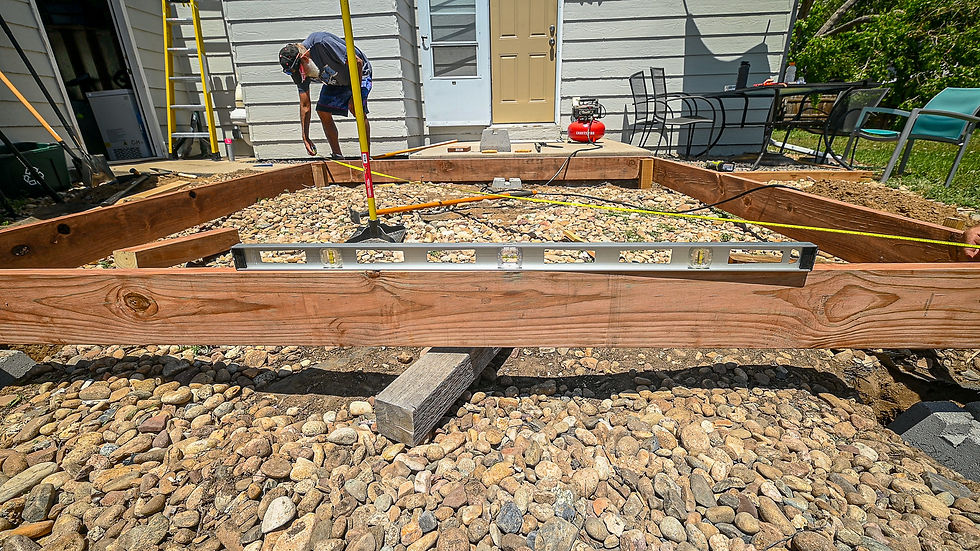
Framing the Deck
With the holes ready, I moved on to framing. The rim joists were cut to 112 inches and temporarily attached to the concrete patio using quarter-inch by 2 ¾ inch Tapcon screws. These were only temporary and removed later since the deck isn’t going to be permanently attached.
The rim joists were prepped with strong tie joist hangers spaced every 16 inches, secured with galvanized connector nails.

My dad and I made sure the entire frame was level and square before proceeding, checking corner measurements carefully.

Although we were off by just over an inch due to following the patio’s edge, it was acceptable and just made deck board installation a bit trickier.
Next, I prepared ground contact four by fours to fit into the deck blocks, cutting and marking them precisely using a speed square to ensure they would align flush with the rim joists.
Each four by four was clamped and nailed securely to the rim joists, then reinforced with 4.5-inch structural wood screws for extra stability.
Installing the Inner Joists

Had to keep clearing out rocks to make the joists float above the ground. Then we placed the joists in the joist hangars and secured with the nail gun, 3 screws on each side of joists and sent home some angled screws into the joist hangars.
Adding Weed Barrier and Installing Deck Boards
Before installing the deck boards, I laid down heavy-duty landscape fabric underneath the joists, securing it with 8-inch landscape spikes. This might help deter weeds and plant growth under the deck, although its effectiveness is uncertain.
The deck boards I chose were 5/4 by 6 inches by 10 feet pressure-treated redwood-toned lumber. To ensure evenly spaced screws, I pre-drilled holes along the boards using a speed square as a guide. I used #9, 3-inch Torx wood deck screws, placing two screws at each end of the boards for now.

Many of the deck boards were warped, so we crafted a simple lever tool to straighten them out before securing. This involved screwing a 3-inch screw into a wooden stake and using it as a fulcrum to push the board flush, then fastening it down securely.
Final Adjustments and Finishing Touches
We ran into a minor issue where the last deck board was an inch short to fully cover the deck. This was due to some boards being wider than others, so we trimmed a few boards down to ensure a consistent overhang. I sanded and stained the cut edges for a neat finish.
Once most of the deck was assembled, all that was left was to finish driving the remaining screws and trim the edges of the deck boards by about an inch on both sides to clean up the appearance.
To make use of leftover gravel from a previous project, I filled the space under the deck with it, providing better drainage and a more polished look.
Final Thoughts
Building this floating deck was a rewarding project that cost under $800, thanks to careful planning and using materials I already had on hand. The floating design offers flexibility with ground movement and, in many areas, avoids the need for costly permits.
While I’m no carpenter, having my dad’s expertise was invaluable. For those tackling this project solo, I recommend taking your time with leveling and framing, as these steps are crucial to a stable and beautiful deck.
If you’re considering a similar project, I’d love to hear your thoughts on this build or any tips you might have for improving the process.
Frequently Asked Questions (FAQ)
Do I need a permit to build a floating deck?
Permit requirements vary depending on your local building codes. Many areas do not require permits for floating decks under a certain size, but always check with your local municipality before starting construction.
What size should the deck blocks be, and how many do I need?
The size and number of deck blocks depend on your deck dimensions and design. For a 10x10 deck like mine, I used eight concrete deck blocks evenly spaced to support the frame adequately.
Can I build a floating deck myself without carpentry experience?
Yes! While carpentry skills help, many DIYers can successfully build a floating deck by carefully following instructions, measuring accurately, and taking their time with leveling and framing.
How do I prevent weed growth under the deck?
Laying down heavy-duty landscape fabric secured with spikes can help deter weeds, though it may not eliminate them entirely. Regular maintenance and gravel fill can also assist in weed control.
What type of wood is best for building a floating deck?
Pressure-treated lumber is commonly used due to its resistance to rot and insects. Redwood or cedar offer natural beauty but may require more maintenance. Always treat cut ends with waterproof stain for added protection.


Comments